I procrastinated on making art by building a tool for making art. Of course, it got out of hand. Or rather, as in this example, it got inside the hands:
You are looking at an output of Kabelsalat, a browser-native node-based workflow editor for image and video effects and interactive visuals. I also did a cute little launch video, using the /brag skill:
Pixelsuppe, reheated
A few years ago I wrote what I then called Pixelsuppe (pixel soup), a Python project where image and video effects were pieces of code that could be plugged together easily. Nothing too crazy, I just wrapped Pillow images and video frames, added transforms for things like pixel sorting and masks, and some helpers to make it easy to combine the pieces in scripts. Running a script applied the effects to an input image or video and saved the output.
Lately, I wanted to get into creative coding a bit more, so I decided to redo that project, but to do it properly: fully in-browser, with an intuitive UI and support for interactive art. Another evergreen motivation of mine: wanting to push the current AI coding models and see what I could build with them, which is my way of keeping up with the Claudashians, so to say.
At some point it was sufficiently different from what I had built before that I needed a new name. Considering there are a lot of cables on the screen when using this app, I went with Kabelsalat. Literally “cable salad”, the German word for that tangled mess behind your desk. At least the cables in my app have an undo button.
A first look
I already liked the feeling of connecting nodes in ComfyUI, so I adapted it (ComfyUI’s LiteGraph implementation, to be precise) and built an image-processing playground around it:
Refraction lens goes between a photo and the Output. Its node preview compares before and after while I drag Strength.A node takes some input, does something to it, and offers the result at an output socket. Connect that socket to another node and its result becomes the next node’s input. A collection of connected nodes (an acyclic graph) is a workflow.
Here’s a slightly more artsy use: the Terminal dancer example turns a dance clip into green terminal characters.
Input clip
Matte from the portrait model
Terminal dancer output
The Portrait Mask node runs MODNet, a small matting model of about 6.5 million parameters. It cuts people out of photos, including full bodies despite the models description. It runs right in the browser, through Transformers.js on top of ONNX Runtime Web, using the GPU via WebGPU when available.
The model outputs a matte: white for the dancer, black for the background, and shades of gray along soft edges. The full workflow below shows how that mask is used: Apply mask keeps only the dancer’s pixels from each input frame, and Glyph raster replaces each little cell of the remaining image with an ASCII character, picking dense ones like @ and # for bright cells and sparse ones like . and : for dark ones. The characters then land on a dark green background. Bish bash bosh, hacker aesthetics.
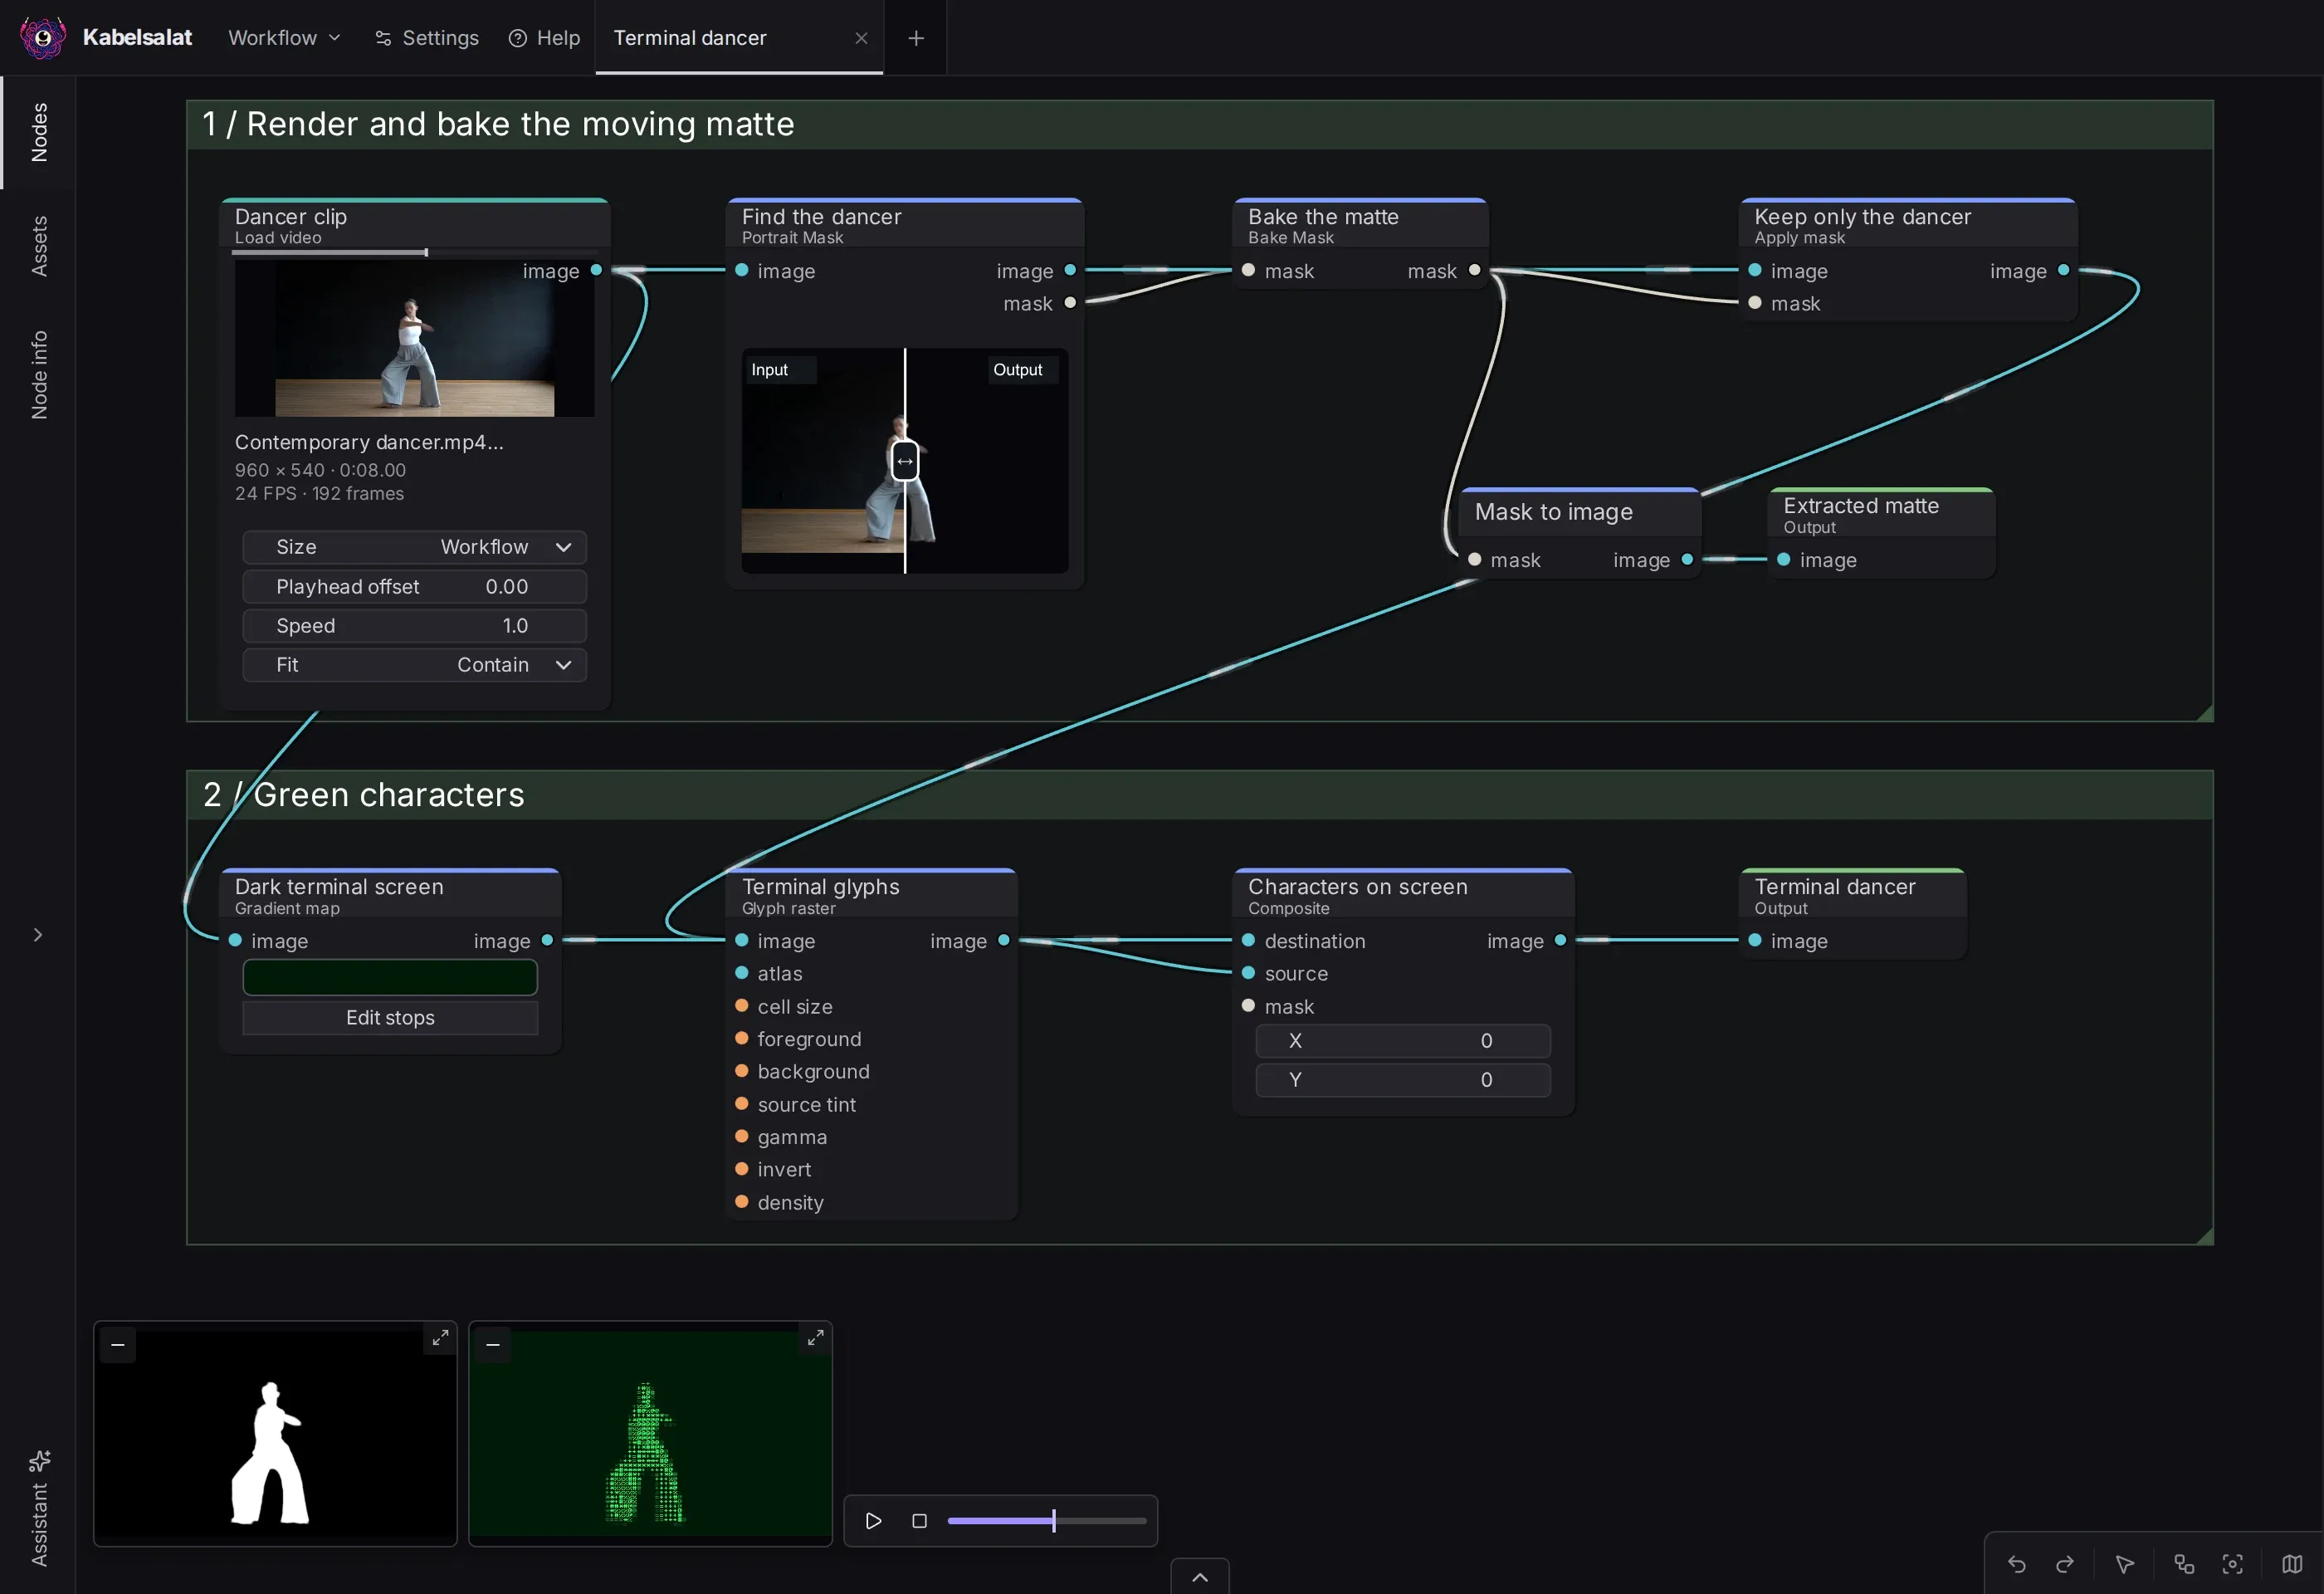
Terminal dancer workflow in Kabelsalat. The colored groups are just for tidiness. Bottom left: the extracted matte and the final output.Now make it move: Signal nodes
You can drive node settings from anything that outputs a value, for example a Sine generator node. These “signal” nodes produce a value that depends on the current time and on their own settings (which you, if you’re adventurous, can of course drive with other signal nodes, too).
The simplest one is the Sine node. By default it swings between −1 and 1 once per second, which happens to be exactly the range of the twirl Strength in Lens warp:
Sine node wired into the Strength of Lens warp.Example: Liquid displacement
The Liquid displacement example takes this a little further. It generates two noise fields. A noise field is just a grayscale image of smooth, cloudy random values, like a height map of rolling hills. The first field is mapped to colors with a Gradient map node. The second noise field (Moving displacement in the workflow screenshot below) decides how far, and in which direction, each pixel of the colored image gets pushed around. Two Sine signals slide that second field in a slow circle, one full lap every ten seconds, so the animation loops seamlessly, which tickles my brain.
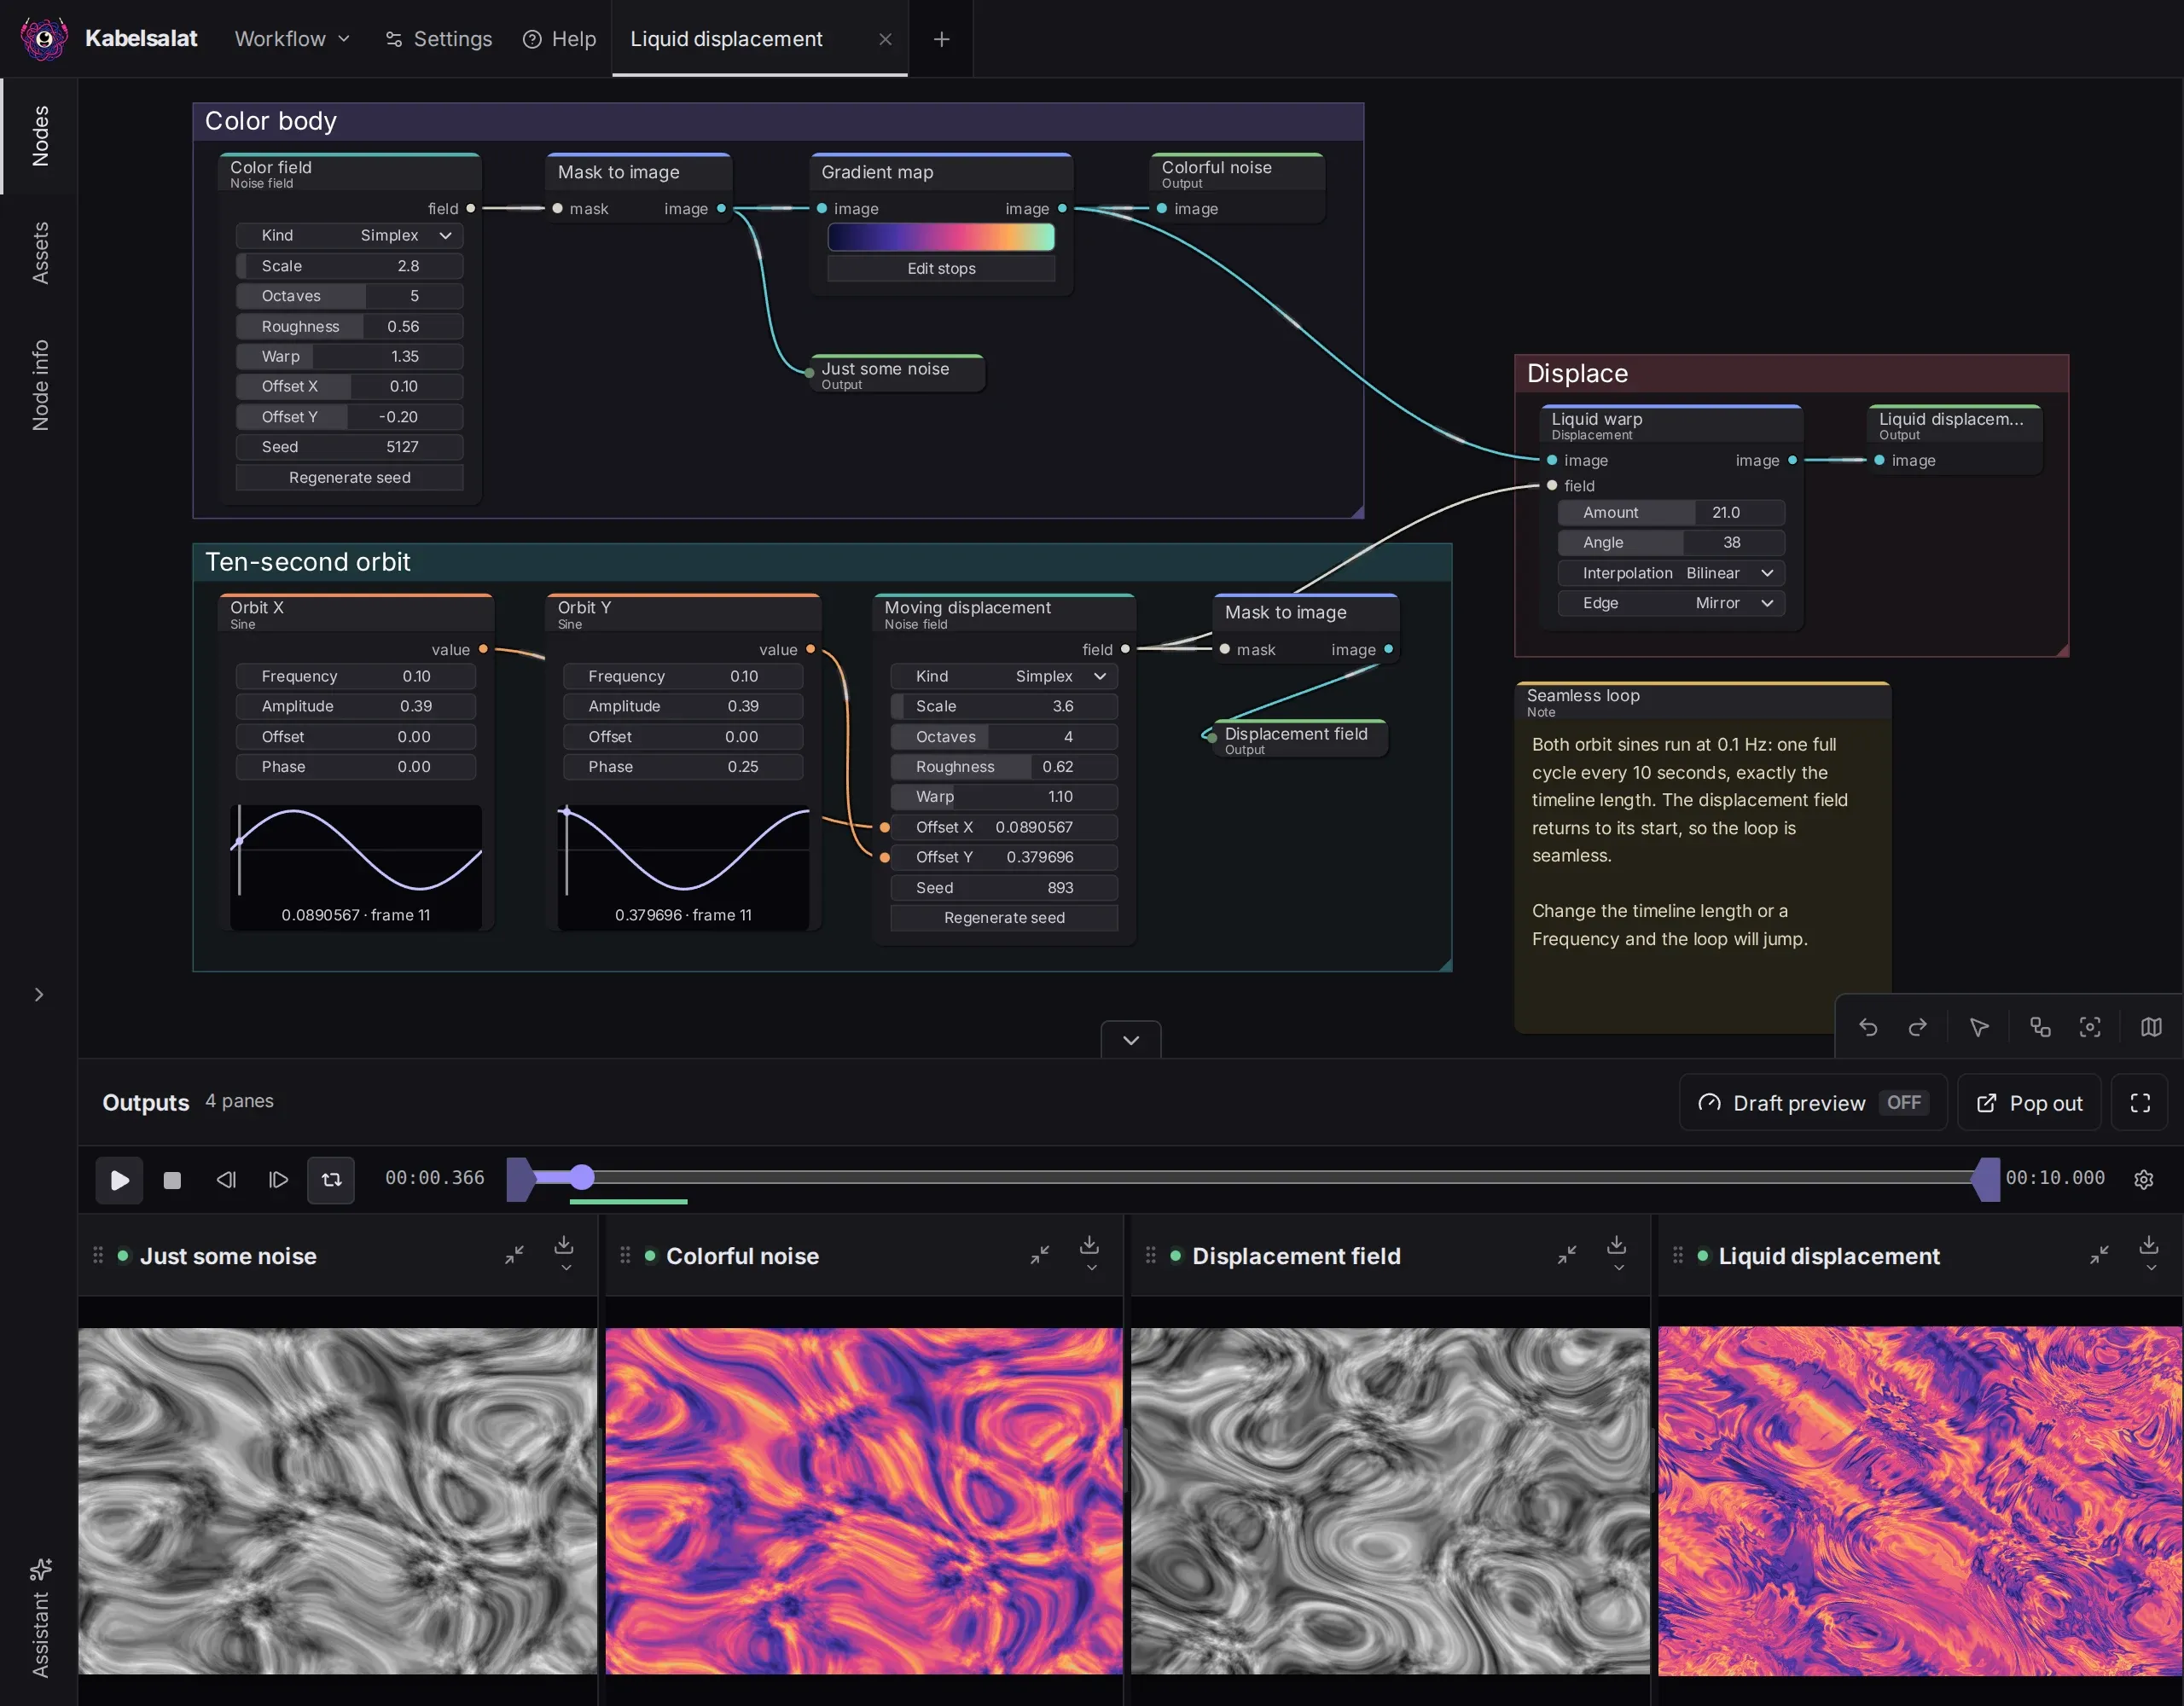
Signals can also come from other places:
- More waveforms: Triangle, Saw, and Square, plus Random for repeatable randomness.
- Keyframe curves: for more deliberate timing, with hold, linear, or eased interpolation and looping support.
- The clock itself: You can easily get the workflow time in seconds, or alternatively the current frame number.
- Audio features: You can extract loudness, bass, treble, or the beats. So the bass energy of a track can drive your workflow to make for audio-reactive effects. You can also extract features from a microphone input.
- External input nodes: MIDI controllers (making use of the excellent controller mappings from Mixxx) and also gamepads, in my case a Stadia controller.
- Code: a
p5.js Signalsnode computes values from JavaScript, if that’s your jam.
Then there are some math nodes to Add, Multiply, Map Range, or Clamp your signals.
Videos, and a bit of time travel
Videos ride on the same clock as the signals. A Load video node hands out the frame at the current playhead, and its Playhead offset is just another setting with a socket, so you can wire a value into it and shift the video in time.
The Chromatic echoes example abuses exactly that. It loads the same dance clip three times. One Control node holds the echo spacing (0.24 seconds), and two Multiply nodes turn it into −0.24 and −0.48 seconds, so the second and third copy run slightly behind the first. Then each copy gets its own color: a Gradient map paints its dark tones black and its bright tones yellow, cyan, or magenta. Finally, two Blend nodes in Screen mode stack the three copies back together. Where nothing moves, the inks add up to plain gray tones again. Where the dancer moves, we get a nice visual:
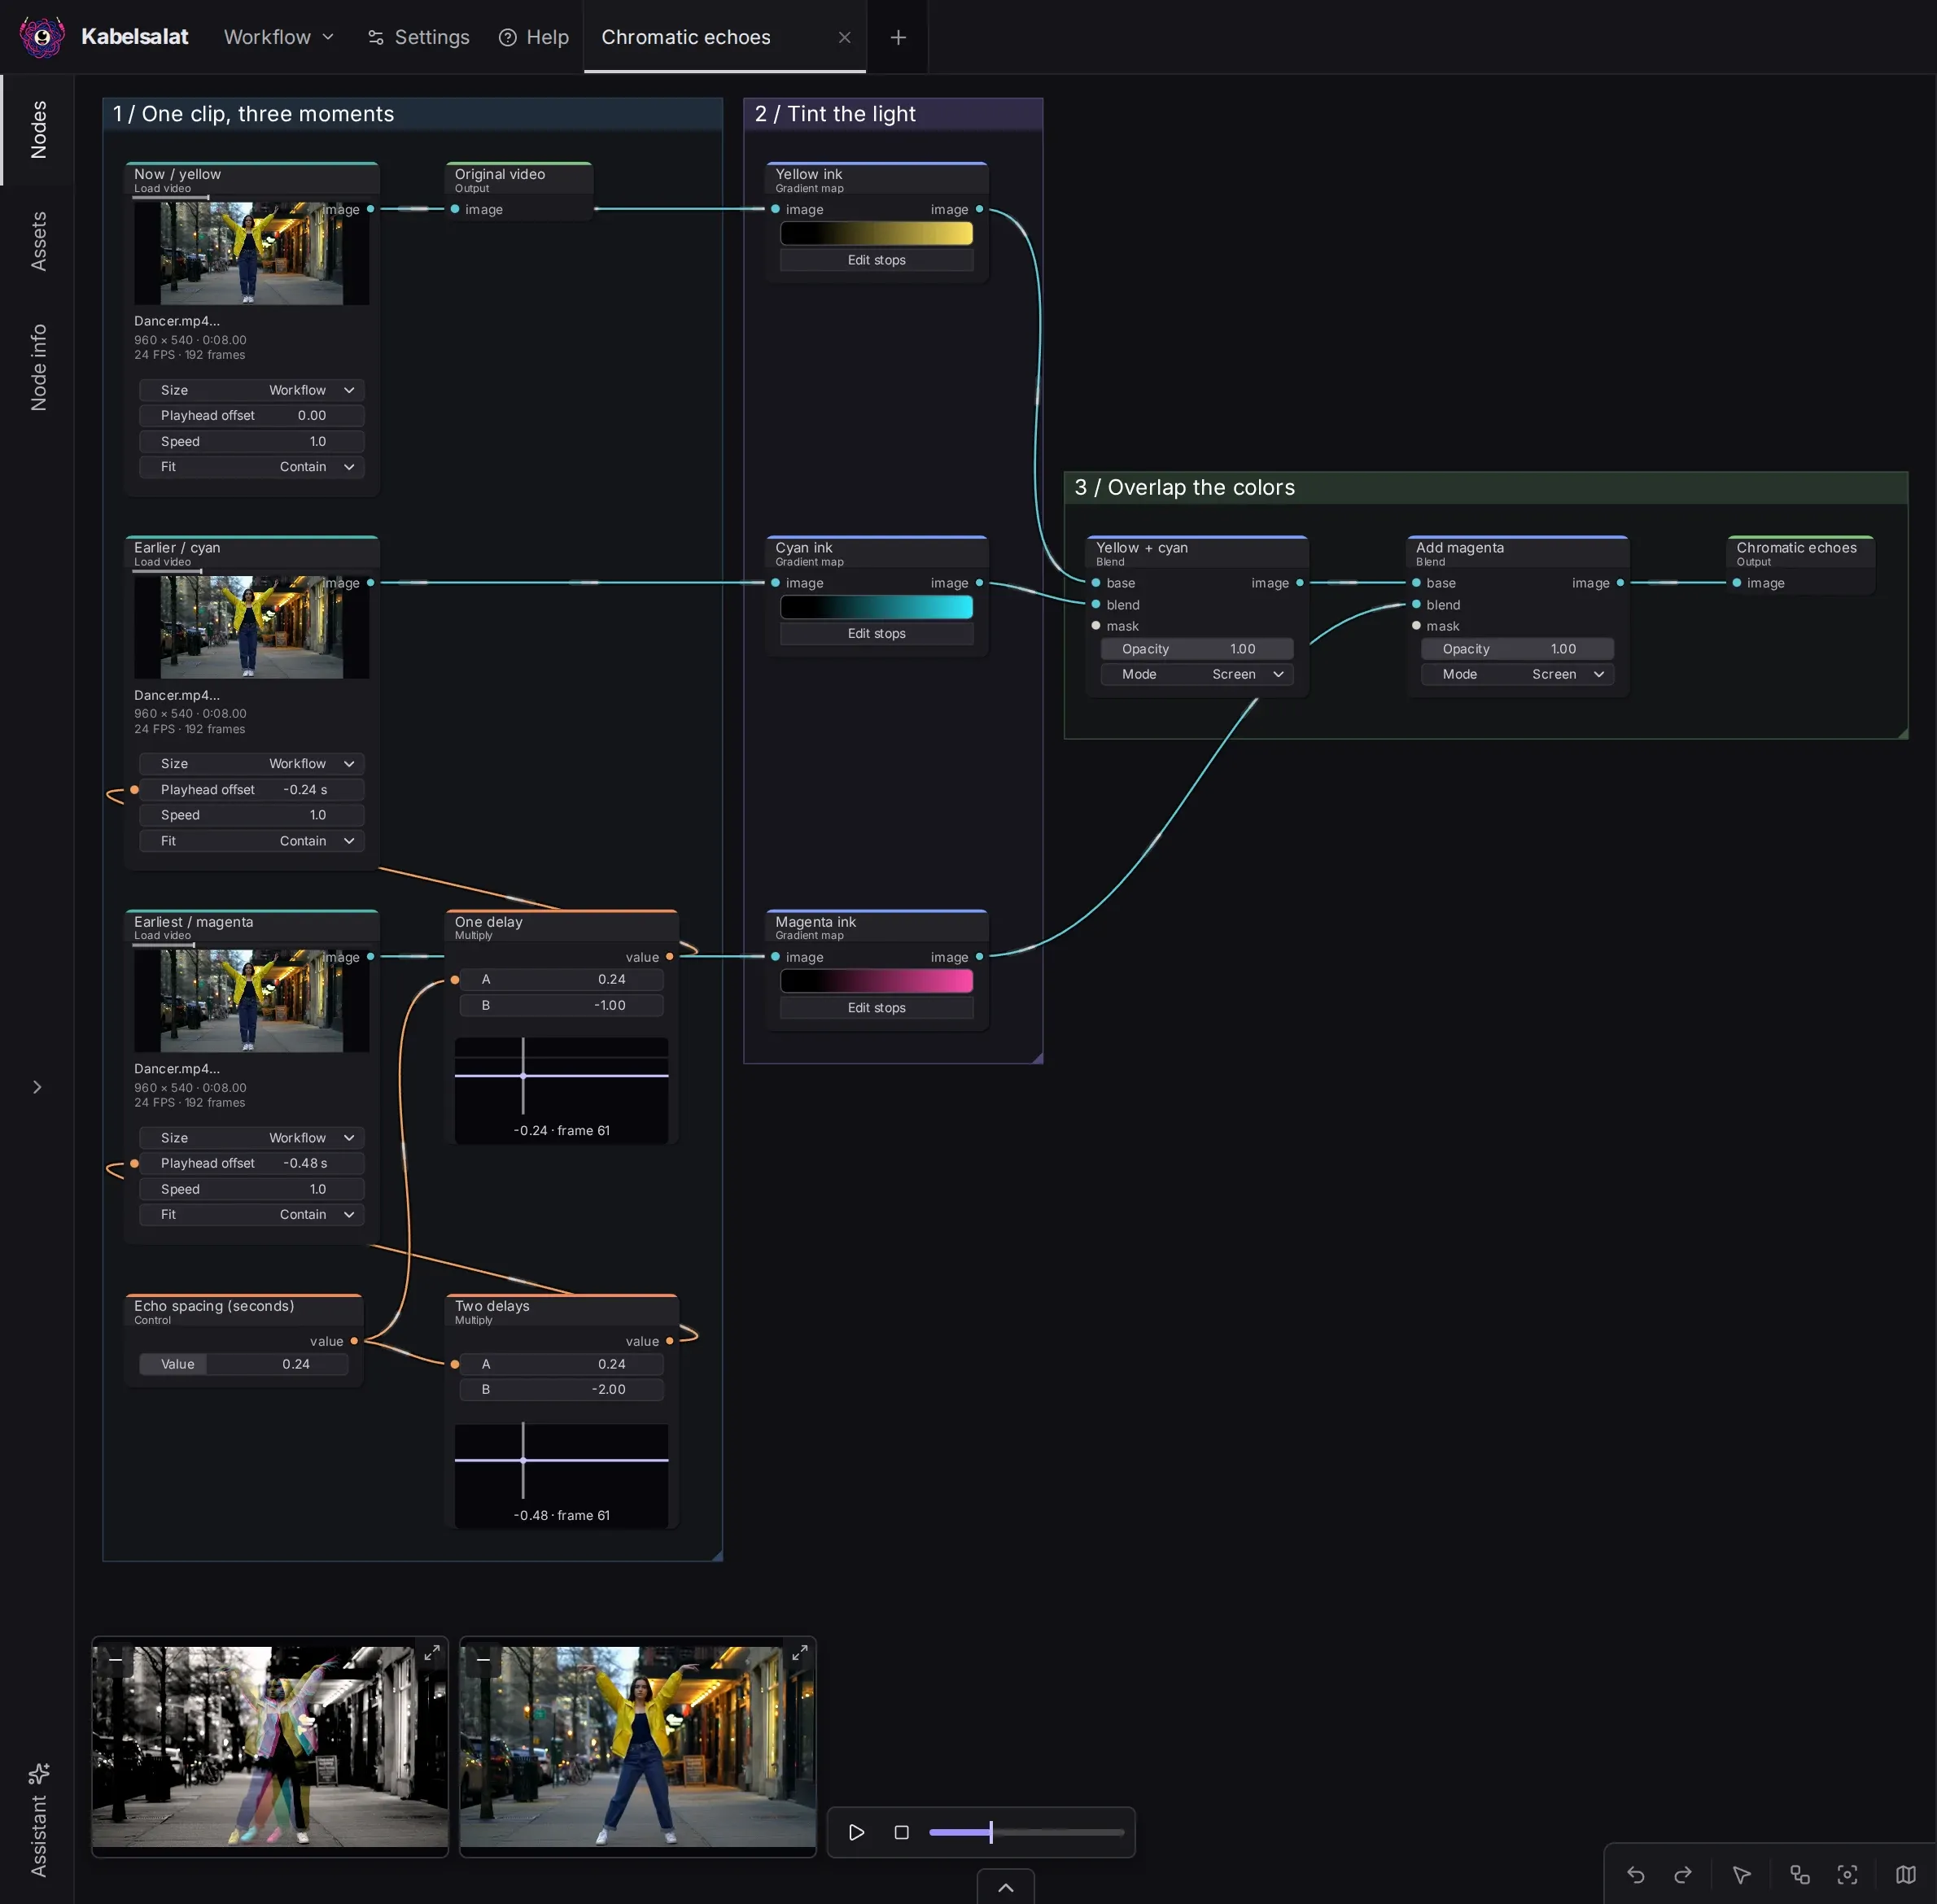
Chromatic echoes workflow. The orange wires carry values: the echo spacing, multiplied into two playhead offsets.Original
Chromatic echoes output
How the example at the very top of the page was made
As for the interactive example at the top, it uses Google’s MediaPipe Hand Landmarker, a hand-tracking model of about 8 MB. For every webcam frame, it finds landmarks: 21 named points per hand, from the wrist to each fingertip, with their positions in the image. Let’s have a look:
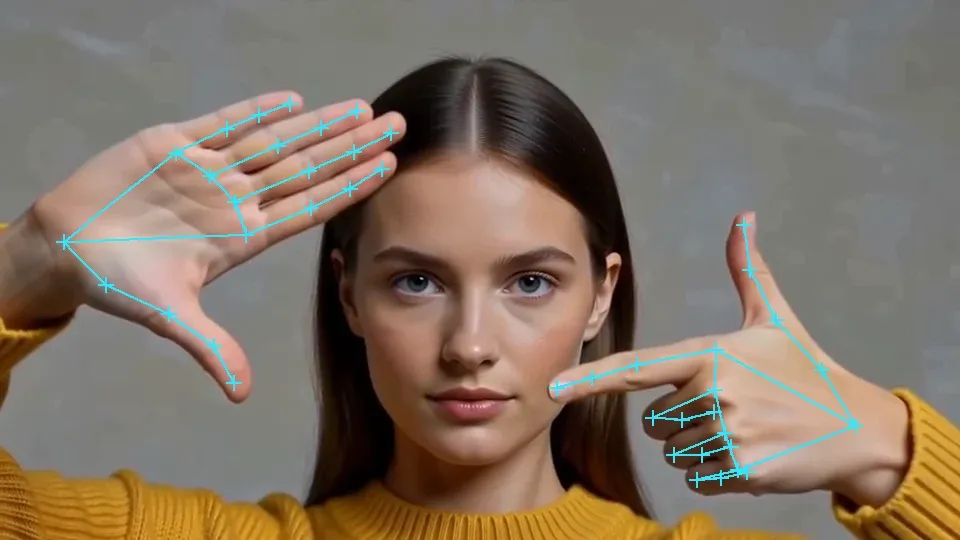
HUD overlay node that I added for debugging purposes.From the detected thumb and index tips of both hands, I can generate a mask using a Landmarks to mask node. I also blur its edges a little; I think that makes for a nicer effect.
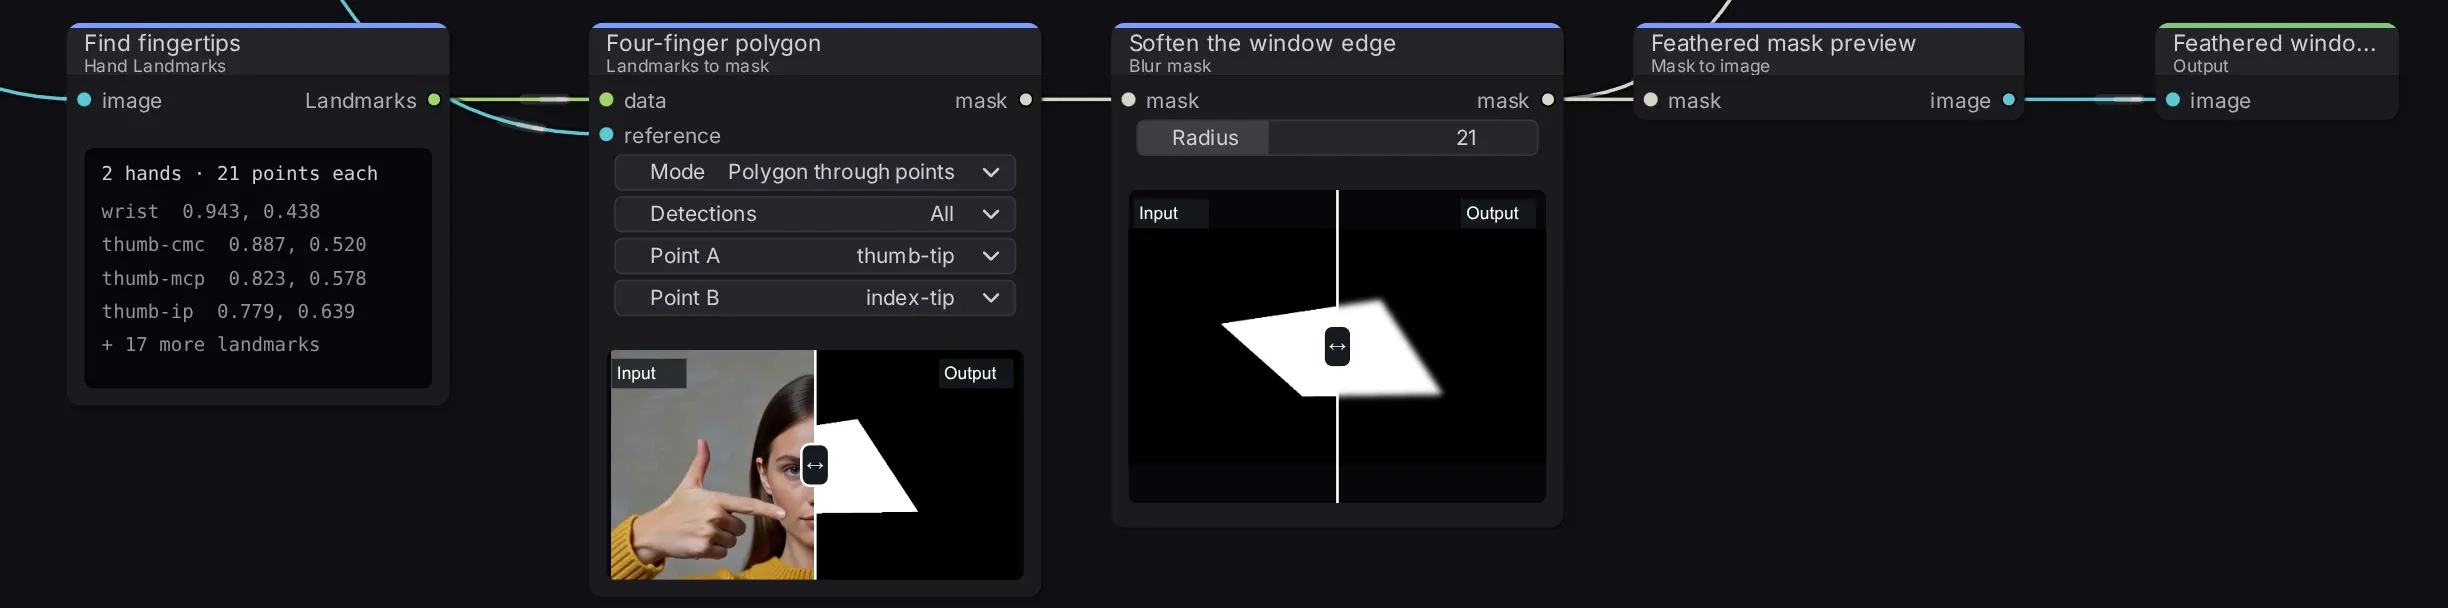
The input to the Find fingertips node is just the camera video. But the camera image also takes a second route, to generate the version inside the four fingertips: a Displacement node pushes its pixels around guided by a slowly drifting noise field, and a Gradient map recolors the result in pink and violet. A final blend uses the fingertip mask to put that Effect image over (a gently color-graded version of) the camera feed.

(Color-graded) input
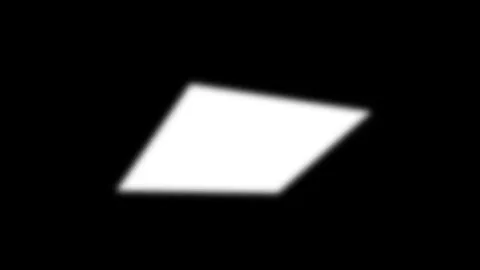
Fingertip mask
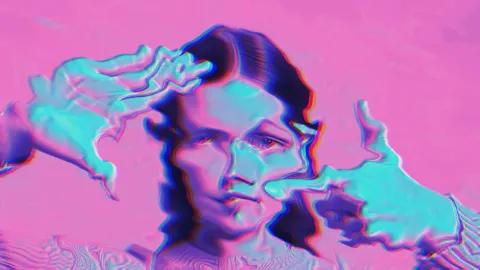
Effect
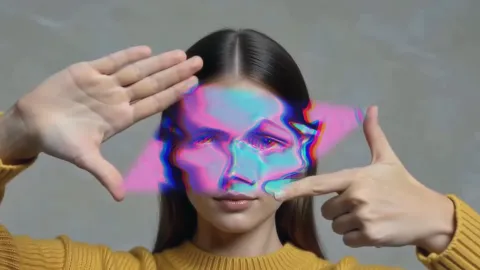
Final blended result
There are also nodes to turn landmark coordinates, distances, and joint angles into numbers. The gap between thumb and index finger can control Pixel Sort’s Amount, for instance. A raised arm can change a parameter. The same sort of wiring works with MIDI controls and gamepad sticks, so I can turn a workflow into something I actually play with.
Hand tracking is one of seven specialized vision models in Kabelsalat, all running fully in your browser:
- Portrait mask (MODNet): separates a person from the background.
- Object selection (SlimSAM): click a few points or draw a box, and get a mask of that object.
- Background removal (BiRefNet Lite): a cutout for anything in the foreground, not just people.
- Depth map (Depth Anything V2 Small): guesses how far away every pixel is. Fun in a red/blue anaglyph workflow for a fake 3D effect.
- Pose, hand, and face landmarks (MediaPipe): especially the face landmarks are super dense and detailed.
How does this work under the hood?
To render an Output node, the rendering engine follows its connections backwards to find the inputs it needs. A workflow is a directed acyclic graph: nodes connected by one-way edges, with no loops allowed. Without circular dependencies, the renderer can always arrange the work such that each node’s inputs are ready before that node runs.
All of that runs in a Web Worker, a separate JavaScript thread that can’t touch the page and only talks to it by passing messages back and forth. That way, while the worker prepares frames and sends work to the GPU, the editor stays responsive, preventing a heavy render from turning the app into a slideshow.
The GPU work goes through WebGPU, the browser’s modern interface to the graphics card. I don’t use it directly, though, but through VGPU, a fairly new TypeScript library on top of it. VGPU gives me two main niceties: (a) Shader files have their inputs type-checked, so a renamed shader parameter breaks at build time instead of rendering gibberish or crashing, and (b) the same code can also run in headless Node, and against a mock GPU, allowing for better tests (proper CI/CD testing without a GPU!) and quicker iteration because you(r agents) don’t have to start a browser to render a workflow.
Most image effects are implemented as WGSL shaders (small programs for the GPU). A shader reads input textures (~images) and writes an output texture. For something like a color adjustment, lots of pixels can be processed in parallel.
The texture one effect produces becomes the next effect’s input directly on the GPU, without bringing all its pixels back into JavaScript between steps. Only the finished output is copied into an ImageBitmap and sent back to the editor, which draws it into the preview:
The AI models run in a separate inference worker, so the renderer has to copy the input frame off the GPU into ordinary memory, send it over, and wait for the result to come back. I didn’t figure out a way to keep it all on the GPU, which would spare that round trip, but thanks to caching and baking (see the next section), the AI models really only have to run once per image or video they process.
Making it fast
My favorite way to use Kabelsalat is to build an interactive workflow, project it onto a wall, and interact with it using my controller. That only works if the picture keeps up with my thumbs, so the renderer has to maintain a high FPS by rendering frames as fast as possible.
And since the fastest render is the one that never happens, caching is the obvious move. For each node’s result, the renderer remembers what went into it: its parameter values and inputs. When a later render needs that node with the same ingredients, it reuses the stored result instead of computing it again. For example, when I change the glyph color to blue, this is what happens:
The easy (well, easier) part of a cache is the rule for when something is reusable. The hard(er) part is deciding which cached results walk the plank once the memory fills up: you need a cache eviction strategy. Classic choices are least recently used (throw out whatever hasn’t been needed for the longest time) and least frequently used (throw out whatever has been needed the fewest times). Smarter strategies also ask how long a result would take to compute again, and how much memory it takes up.
For Kabelsalat, after arguing with Opus for a while, I went with Greedy-Dual-Size-Frequency, which does all of that. A result’s value is roughly how often it gets reused, times how long it would take to recompute, divided by the memory it occupies. The renderer measures those times as it runs, and a result also gets credit for the work of the upstream nodes it saves. Works like a charm!
There are three main other features that help the responsiveness, too:
- Draft preview: reduces the output resolutions for experimenting; exports stay in full quality.
- Frame cache: while playback is paused, the renderer pre-renders the next frames and fills the frame cache. A green strip under the timeline shows which frames are currently cached:

- Baking: a
Bakenode goes one step further. Put it behind an expensive branch, and Kabelsalat renders that branch for a whole frame range once and stores every frame losslessly in the browser storage for later reuse. Why “baking” and not just more caching? The caches above work automatically, live in limited memory, and forget things whenever they need room. A bake is something you ask for, it covers the whole range up front, and it stays in the browser’s storage until you delete it. I use it, for example, to run a slow AI model over a whole video once, up front: theTerminal dancerexample bakes its matte that way.
The assistant
To make the process of fooling around with some artsy ideas as smooth as possible, I decided to add a chat assistant. It knows the node catalog and can build and edit workflows for you:
Add to current workflow opens a map for placing the new nodes.Like the rest of the app, the assistant has no backend either: the browser talks to OpenRouter directly, using the Vercel AI SDK for streaming and tool calls. You bring your own OpenRouter API key and pick any model from their catalog (well, it needs to support tool calls).
I (well, we..) managed to make this work really well, even when using something as cheap as deepseek-v4.1-flash as the model. The hard part was that with 130 nodes, all with extensive parameter descriptions, you need to be a bit careful about how you build the prompts sent to the model, and you need to design the tools accordingly. Here is how the assistant is implemented and what it can do:
- The system prompt has just a node index: it lists every node’s type and title, plus the essential rules of the workflow format. In total, its well under a thousand tokens for all 130 nodes.
- Tool calls: the model can call a tool to fuzzy-search the node catalog, or another tool to look up the exact details (input/output ports, parameter ranges, and defaults) of up to four nodes at once. It can also inspect the workflow you attached in a token-efficient summary.
- Validation tool: to propose a workflow, the model hands a complete workflow to one more tool call. If there is an issue (e.g. the model connected an image output to a value input), it gets the errors back and one chance to fix them.
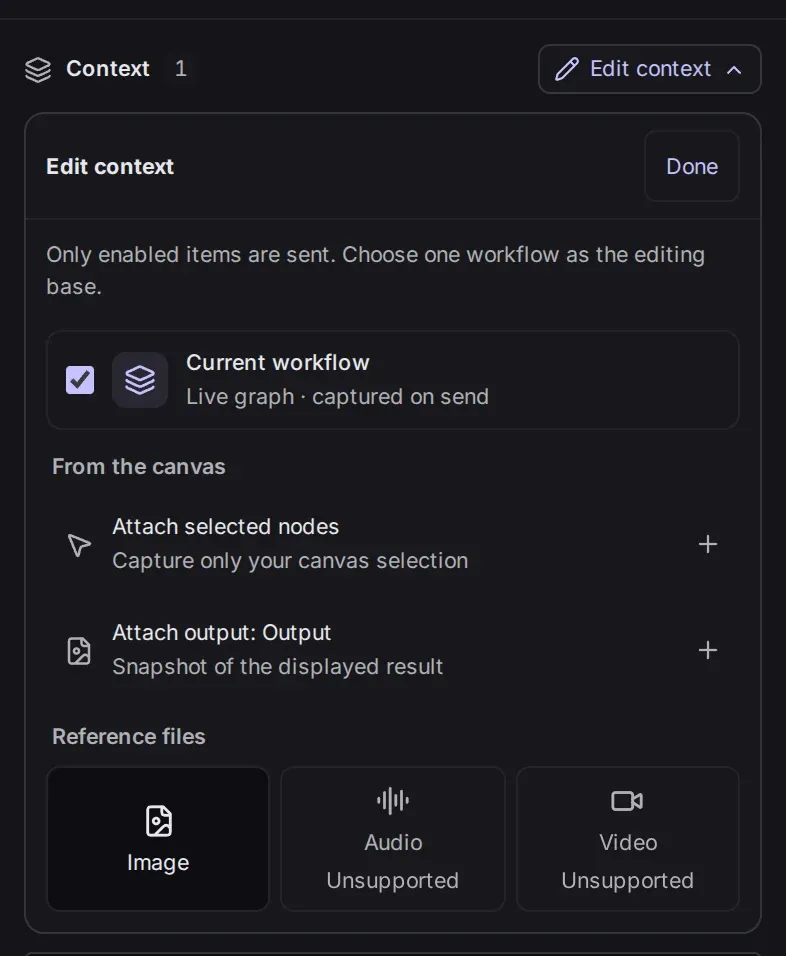
- Explicit context: the current workflow is attached by default, and you can add selected nodes, a snapshot of an output, or even a few seconds of the timeline rendered to video (if the model supports native video input). This is the assistant’s “Edit context” panel:
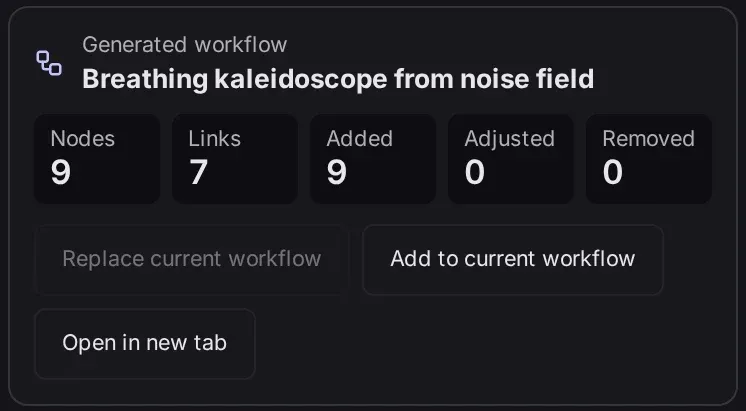
- Review-then-apply: the model never touches the canvas directly. It proposes a workflow, and you decide: open it in a new tab, replace the current workflow with it, or add the proposed nodes to the current workflow:
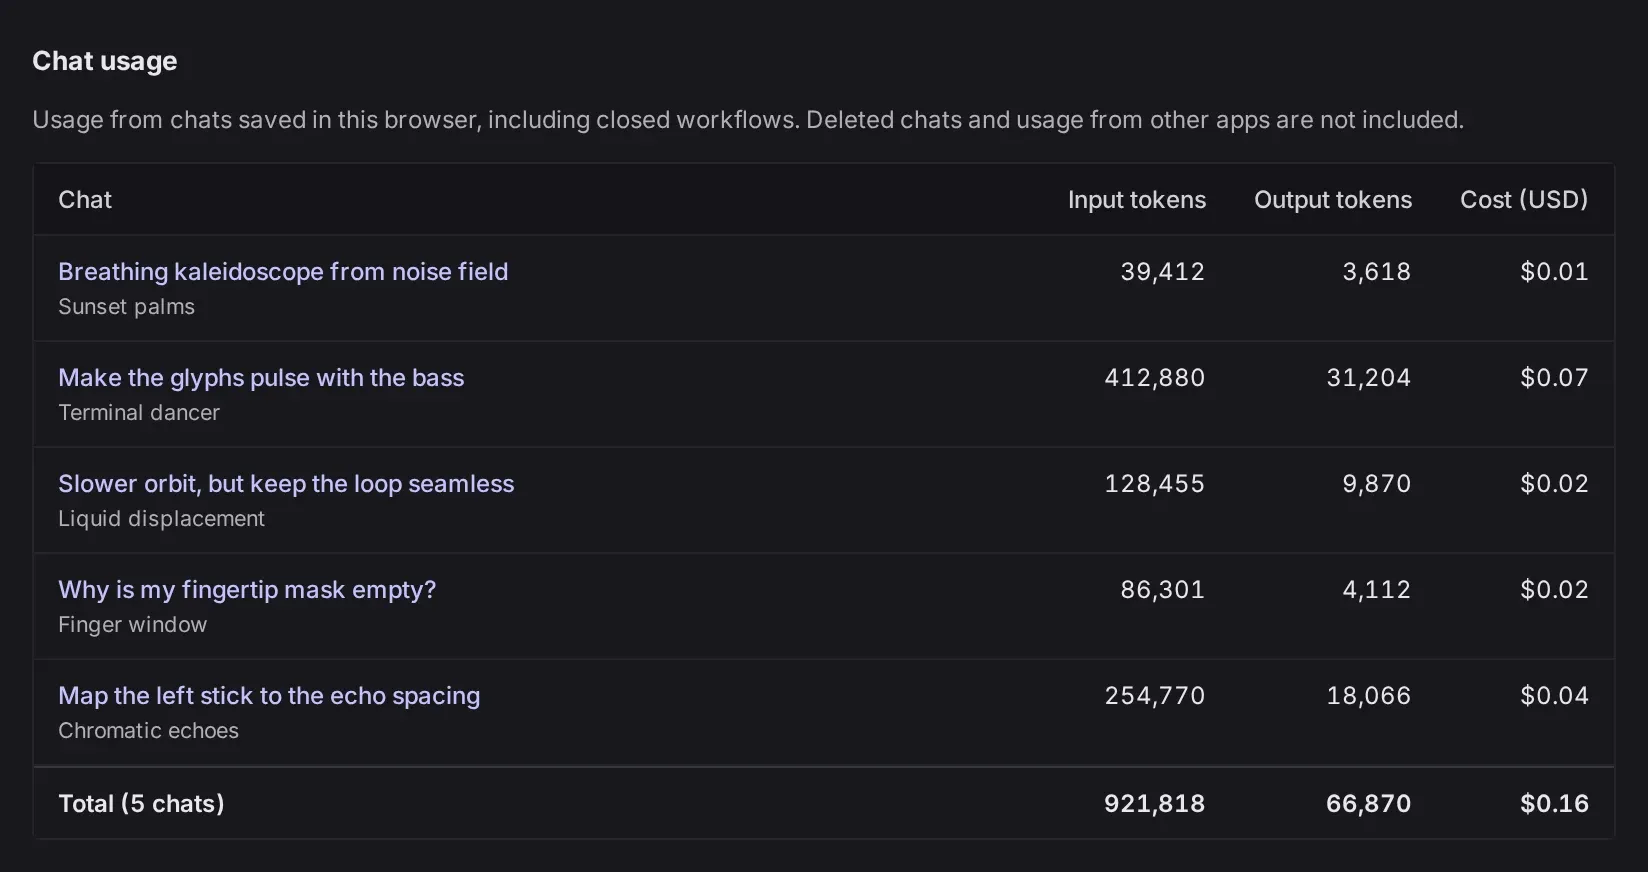
- Cost tracking: the assistant keeps track of what every chat costs. After each request, it adds the tokens used and the cost that OpenRouter reports for that request to the chat’s tally. Settings → Assistant → Usage then lists all chats saved in the browser. My kaleidoscope chat from above cost less than a cent ($0.0079, which the table rounds up):
Random collection of cool features
- p5.js support: a
p5.js Canvasnode runs a sketch (optionally reading an input image), and the result is fed back into the workflow; ap5.js Signalsnode produces values that can control other nodes. Variables in the code can be exposed as node inputs with special comments. - WGSL shaders: the
WGSL Shadernode runs a fragment shader you write yourself, with up to four images and two masks as inputs. - Portable workflows: workflows can be exported to JSON files. Exported image outputs also carry the workflow that produced them in their metadata, so you can drop one back into Kabelsalat to recover the workflow. Alternatively, the
.kabelsalatproject files also include the media needed for a workflow, for maximum portability. - Custom hotkeys: every command is listed under Settings → Hotkeys and can be rebound, and Ctrl/⌘+K opens a command palette. It’s a pet peeve of mine when apps don’t let you customize hotkeys, so this had to be in.
- Tabs and undo: several workflows can be open side by side in tabs, each with its own undo/redo history. A dot marks tabs with unsaved changes. Everything autosaves in the browser:

- Multiple output nodes: they can be independently zoomed/panned and also detached into another browser window (useful for projecting onto a wall).
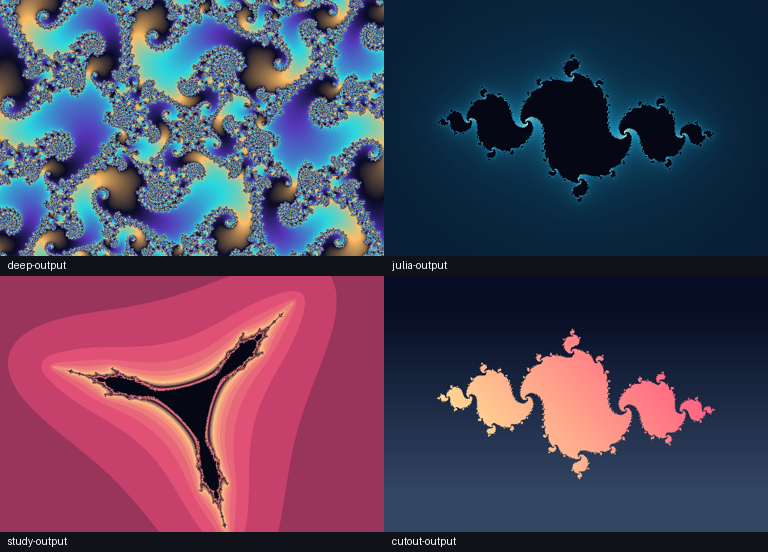
- Fractals: Mandelbrot, Julia, Burning Ship, and a few more exotic formulas too. Mandelbrot goes down to a zoom of 10¹². Look, this is rendering live in your browser right now, as in, it’s not a video!
Limitations
Kabelsalat is built to be fun to use, with an intuitive UI and a low barrier to entry for newcomers to creative coding. If you are looking for something super polished and ready for professional VJing, you are better off using something like Isadora or TouchDesigner.
To be more specific, here are some limitations and things you might miss:
- Needs working WebGPU: The interface is desktop-first, and support for video codecs and MIDI access varies by browser. Large workflows and models can exhaust the available memory, and frame rates heavily depend on your machine.
- No projection mapping: self-explanatory.
- No pro video plumbing: nothing goes in or out over NDI, Spout/Syphon, OSC, or DMX. Live inputs are limited to whatever the browser offers: cameras, screen capture, audio, MIDI, and gamepads.
- No 3D: there are no meshes, cameras, materials, or lights. The p5.js Canvas node only draws in 2D, and the depth-based nodes (Depth parallax, Depth relight, the red/blue anaglyph) fake depth from a flat image rather than building a 3D scene. If you’re stubborn, you can raymarch a scene inside the Shader node, but nothing in the workflow will help you with it.
- Performances can’t be replayed: you can record the live output to a video file, but not the performance itself. The camera feed, MIDI knobs, and gamepad presses aren’t saved as inputs you could replay later, so you can’t, say, render last night’s jam again in 4K with a tweaked color grade. What you recorded is what you get.
That being said, I am happy with how this turned out, and thoroughly impressed with the latest models that helped me build this (Anthropic’s Opus 5.5 and OpenAI’s GPT-6-Astra). And besides that, this is just procrastination! Now let me get back to the things I am procrastinating on, which are… more personal projects.
That’s all!
Try Kabelsalat and start with one of the example workflows. If you wanna hack on it, the source code is here.